
JSON RPC bitcoin visual studio c# application tutorial
Learn with a simple code example how to communicate with a bitcoin server in this JSON RPC bitcoin visual studio c# application tutorial.
Bitcoin client API offers the possibility to communicate with the wallet acting as a server to display balance, get blockchain informations or make bitcoin transactions, this is useful if you want to integrate into your game a mechanic that uses bitcoins or an alternate cryptocurrency as litecoin, monero, ethereum as they share similar APIs.
In this JSON RPC bitcoin visual studio c# application tutorial you will learn how to :
- Configure your bitcoin client to run on testnet and obtain some free bitcoin for testing from a faucet
- Configure the bitcoin application to act as a server and to receive JSON remote procedure calls
- Develop a small application using visual studio and c# to send a JSON remote procedure call to the bitcoin server to obtain a response with the wallet balance (among other informations)
Download and install bitcoin client
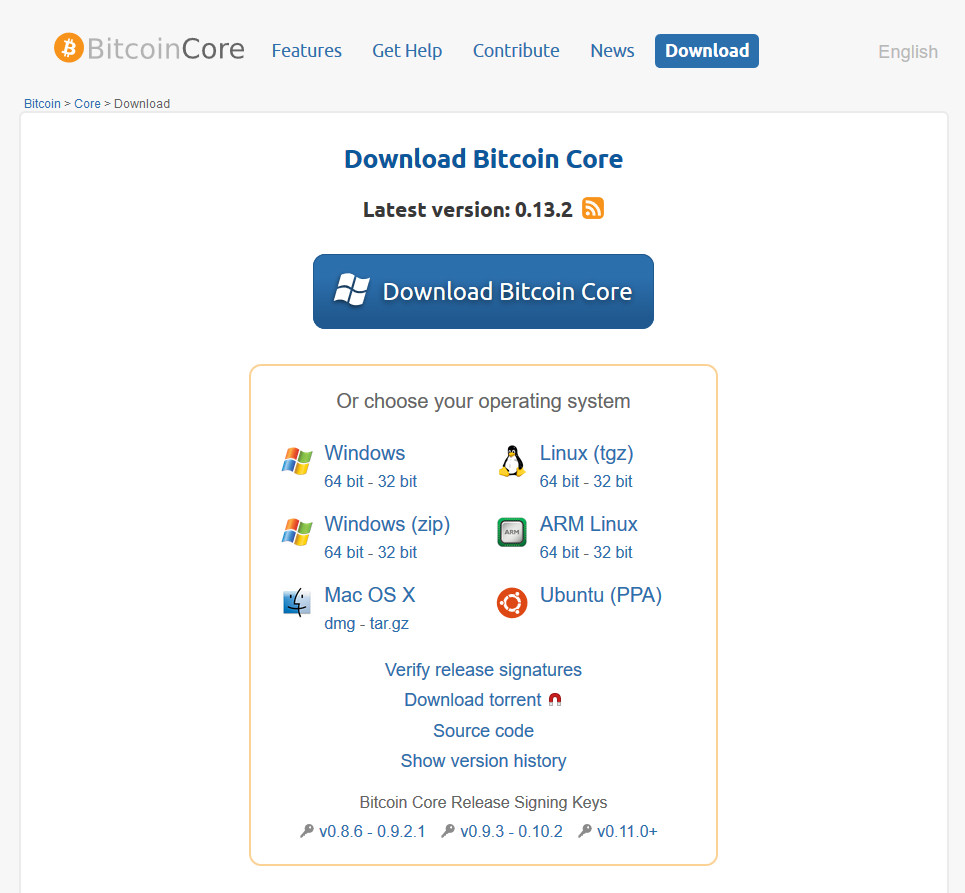
First step in this JSON RPC bitcoin visual studio c# application tutorial is to download the bitcoin client from the official website. You must download and install the Bitcoin Core version of the client, it includes the full bitcoin blockchain and when you start the bitcoin-qt.exe client it will download about 30 Gigabyte of data to synchronize the network with the latest transactions.
Please note that this 30 Gigabyte of bitcoin blockchain data will go in your %AppData% windows folder that generally is on the C: drive, eating lot of space especially if your Windows operating system is on a small SSD.
To avoid to clutter your system disk it is possibile to move the blockchain data on another disk by adding a command line option on the link to the bitcoin-qt.exe with the new directory location. Create a link to the bitcoin-qt.exe file and right click on the link icon and select Properties entry on the dropdown menu, then in the From field add the -datadir=D:\yourblockchaindatadir option.
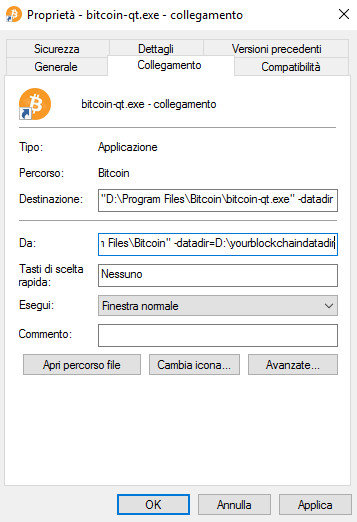
Your complete link command line should look like this :
"D:\Program Files\Bitcoin\bitcoin-qt.exe" -datadir=D:\yourblockchaindatadir
When you start the bitcoin-qt.exe client from that link it will write the blockchain data to the specified directory.
Configure the bitcoin client to run on testnet and get free bitcoins from a faucet for testing
To start testing with the bitcoin wallet without risking to put in danger your hard earned bitcoins it is possible to configure the client to run on the bitcoin testnet, which is an alternative blockchain to be used for testing. To enable the bitcoin testnet add –testnet to the link command line, as of now (Feb 2017) testnet3 blockchain size is 10 Gigabytes.
Your complete link command line should look like this :
"D:\Program Files\Bitcoin\bitcoin-qt.exe" -datadir=D:\yourblockchaindatadir -testnet
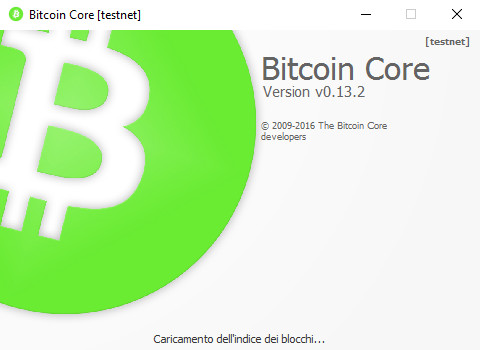
When you execute the bitcoin client from that link it will show a green logo with the testnet indication :

To earn some free bitcoin to be used for testing purposes you can head to a testnet bitcoin faucet and make a request, here are some faucet links where you can make a request with your wallet address :
After some time you should see the transaction in your wallet and your balance increasing, just remember to send back your testnet free bitcoins when you finish testing.
In the following chapters of this JSON RPC bitcoin visual studio c# application tutorial it will be showed how to configure the bitcoin application as a server and a simple c# code example to communicate with it.
Configure the bitcoin client to act as a server and receive JSON Remote Procedure Calls
The previous steps of this JSON RPC bitcoin visual studio c# application tutorial were focused on configuring the bitcoin client to have a safe environment to test and tinker with the cryptocurrency client. Now we need to configure the bitcoin client as a server able to receive JSON RPC calls and reply to them.
It is sufficient to add some other options to the command line that calls the bitcoin client, these option will manage the json rpc feature of the server as authentication and listening port:
"D:\Program Files\Bitcoin\bitcoin-qt.exe" -datadir=D:\yourblockchaindatadir -testnet -server -rpcuser=testuser -rpcpassword=testpassword -rpcport=8332
Now your wallet is configured as a server and can reply to remote procedure calls, it is time to see with a simple code example how to program a c# application in visual studio to send a JSON RPC to the bitcoin server and return the wallet info.
Visual studio C# JSON RPC console application code example using JSON.net library
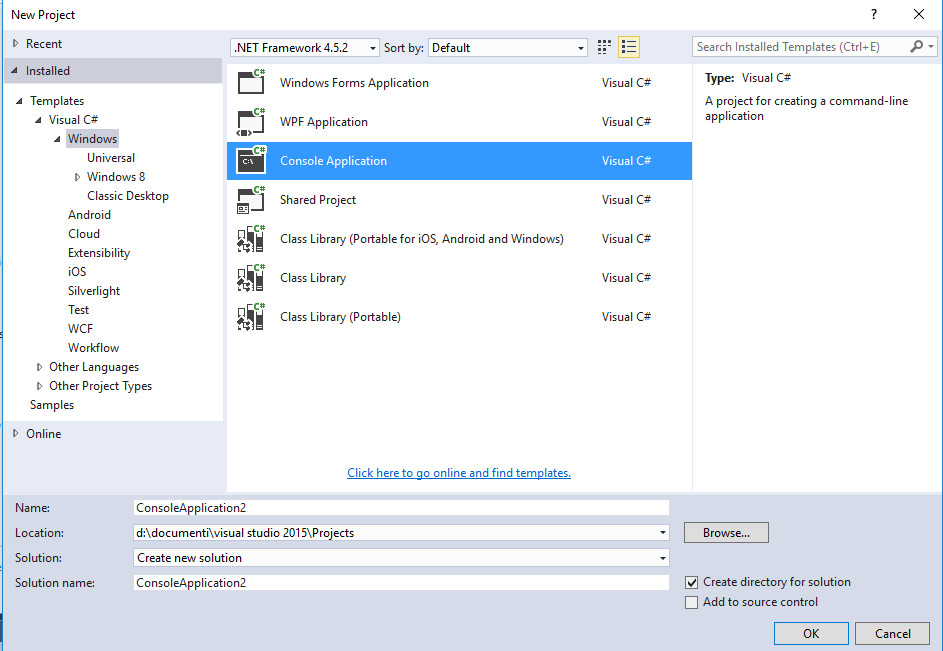
To communicate with the bitcoin server using JSON RPC a simple c# visual studio console application can be written, so run Visual Studio (i use 2015 free community edition) and create a new project choosing Visual C# Console Application from the available templates :
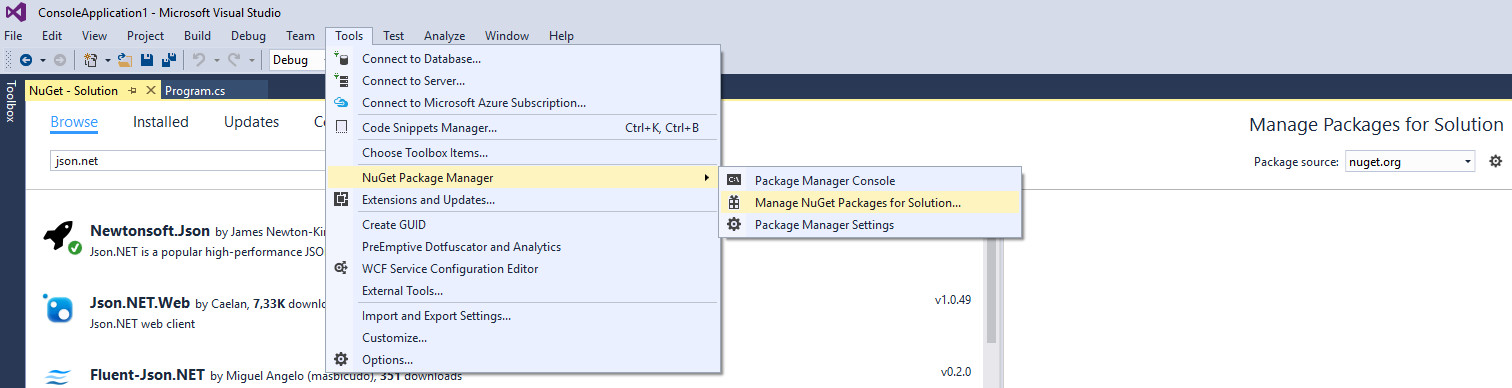
To be able to form the JSON call and parse the bitcoin server response the JSON.net library will be used. If you use one of the latest version of Visual Studio you can get it installed using the NuGet Package Manager tool you can find under the Tools dropdown menu :
Once Newtonsoft’s JSON.net is installed, you can paste this code in the main body of your Program.cs
// Add dependencies
using System;
using System.Collections.Generic;
using System.Linq;
using System.Text;
using Newtonsoft.Json;
using System.Threading.Tasks;
using System.Net;
using Newtonsoft.Json.Linq;
using System.IO;

namespace ConsoleApplication1
{
    class Program
    {
        private static void Main(string[] args)
        {
            Console.WriteLine("Bitcoin getinfo");
            var data = RequestServer("getinfo", new List(){});
            Console.WriteLine(data);
            Console.ReadKey();
        }

        public static string RequestServer(string methodName, List parameters)
        {
            // Use the values you specified in the bitcoin server command line
            string ServerIp = "http://localhost.:8332";
            string UserName = "testuser";
            string Password = "testpassword";

            HttpWebRequest webRequest = (HttpWebRequest)WebRequest.Create(ServerIp);
            webRequest.Credentials = new NetworkCredential(UserName, Password);

            webRequest.ContentType = "application/json-rpc";
            webRequest.Method = "POST";

            string responseValue = string.Empty;
            // Configure request type
            JObject joe = new JObject();
            joe.Add(new JProperty("jsonrpc", "1.0"));
            joe.Add(new JProperty("id", "1"));
            joe.Add(new JProperty("method", methodName));

            JArray props = new JArray();
            foreach (var parameter in parameters)
            {
                props.Add(parameter);
            }

            joe.Add(new JProperty("params", props));

            // serialize JSON for request
            string s = JsonConvert.SerializeObject(joe);
            byte[] byteArray = Encoding.UTF8.GetBytes(s);
            webRequest.ContentLength = byteArray.Length;
            Stream dataStream = webRequest.GetRequestStream();
            dataStream.Write(byteArray, 0, byteArray.Length);
            dataStream.Close();

            // deserialze the response
            StreamReader sReader = null;
            WebResponse webResponse = webRequest.GetResponse();
            sReader = new StreamReader(webResponse.GetResponseStream(), true);
            responseValue = sReader.ReadToEnd();
            var data = JsonConvert.DeserializeObject(responseValue).ToString();
            return data;
        }
    }
}
Press the Start button on visual studio to run the program (remember to start the bitcoin server with the command line created in the previous step of this JSON RPC bitcoin visual studio c# application tutorial) and you should see a command prompt opening with the output of the getinfo request sent to the server.
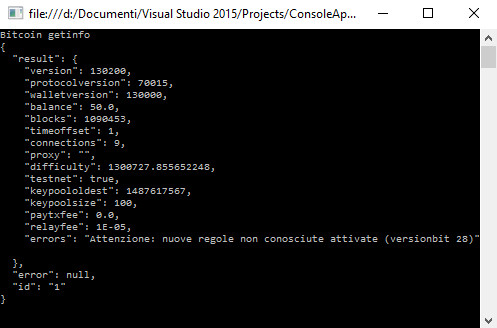
Congratulations you successfully communicated with a bitcoin wallet using JSON RPC !