

blender unity mecanim workflow and actions
- In the MHX Layers tab in the right side menu (in the 3d view panel) deselect the face layer as we don’t need it now. Now select all the visible bone controllers with the A key, then expand to the right the Action Editor window until you see a New button, press it to assign the selected bone controllers to a new action. Call the action wave and press enter.

- Now you can create a Blender animation in the common way, insert keyframes for the moving bones, shift time and bone controllers, insert new keyframes and so on. Try to make a short ( 61 frames, animation starts at 1 ends at 60 ) wave animation, i will not cover blender’s animation system in this blender unity mecanim pipeline tutorial but i will cover the tricky part where you need to save the character animation you created into an action. Assuming you have your character waving :
 Expand again the Action Editor window to the right until you see the action’s name, click on the F button next to the action name to save the current datablock and save the action, a number should appear before the action’s name telling you how many users has the action datablock.
- Now with the A key make sure you deselect everything ( bones and keyframes ) and once saved the action click on the plus button next to the action’s name to create a new action. Note that the new action will be called wave.001 and will retain the old action’s keyframes, make sure to delete them in the Action Editor ( just keep the first with the rest pose ) and change the action’s name into idle. Animate the character to create an idle animation, like moving the head or arms in a waiting pose, make the animation play from 1 to 100 frames. Click on the F button to save the new idle animation, if you click on the icon left of the action’s name you can now cycle trough actions, the list should include both idle and wave animations !
 You successfully created different animations and saved them into actions, that’s the basis to set up a correct blender unity mecanim pipeline to get animated 3d assets into your videogame.
 - Save the .blend file !


Export the animated character into Autodesk FBX (Unity’s format)
Now we go on with the blender unity mecanim workflow tutorial we need to export our .blend file into Autodesk FBX Unity’s format, in Blender go in File->Export->Autodesk FBX (.fbx) and put the fbx exporter options as the following picture :  Be careful with the blue buttons, if you dont’ export the armature you don’t export the animations, if you don’t export the mesh…well…you get nothing !
Now you just need to import the fbx file into Unity.
Embed textures from Blender to FBX and import the fbx file with Animations and textures in Unity
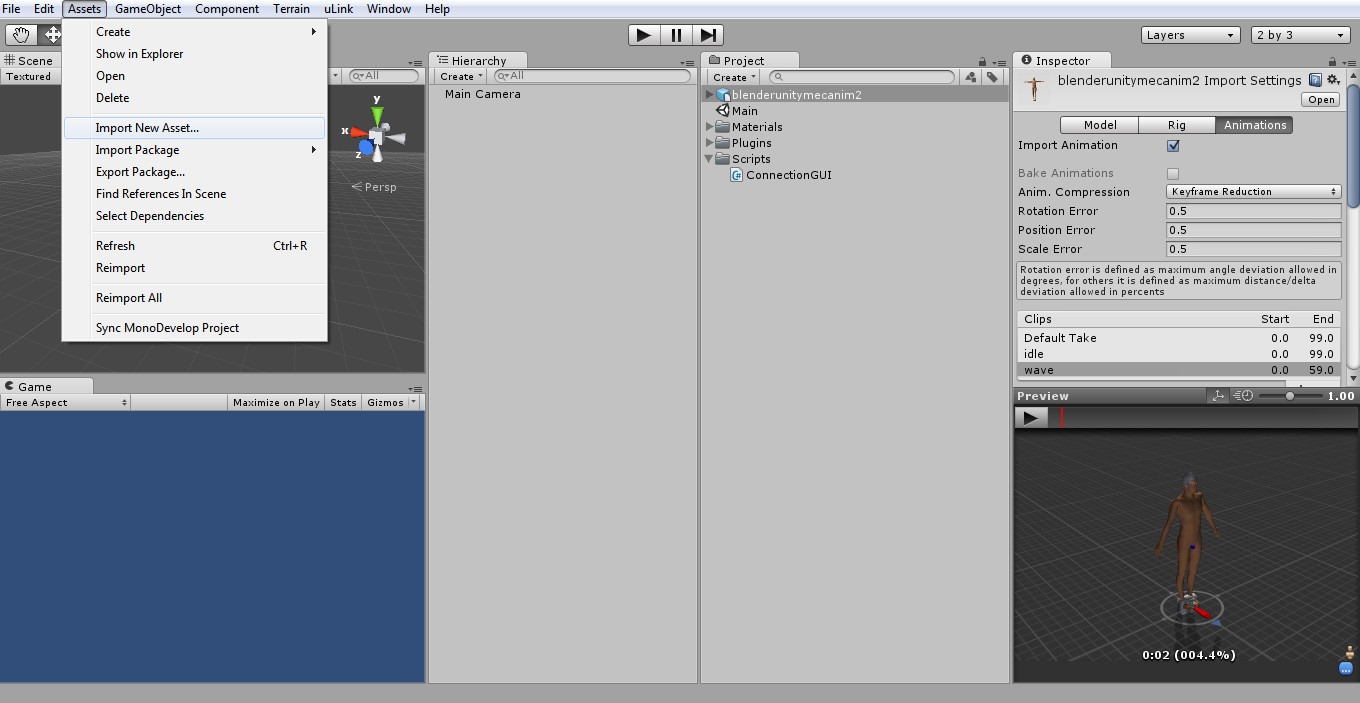
Last step of this blender unity mecanim workflow tutorial, you need now to import the .fbx file into Unity.
- Open Unity free game development tool and go in Assets-> Import New Asset and browse for the .fbx file. Once selected Unity’s import process starts and you may have to wait a while, once the import process is done the model preview should appear on the right of your Unity GUI and in the Animations tab you will se a list with your animation with the corresponding action name and frame length. You can even preview your animations !!! This way you learnt how to set up a working blender unity mecanim pipeline !

- If you run into texture problems (like the hair in my picture) you can try to solve them by passing your .fbx created from blender into the Autodesk FBX converter software to embed the texture files and assign them directly into Unity.

Related posts:
Pages: 1 2